Custom progress indicators in Swift
One of the most important aspects to take care in mobile development is the feedback to the user, especially in the long running tasks. That implies we need to add some components to give information to the user about what is happening with the app. The most popular forms of such feedback are progress indicators.
If you are developing a super cool app with highly custom user interfaces, UIKit standard indicators won’t likely be enough for your needs. In this post, we’ll develop a fully customizable progress bar, that you can use as a replacement of the UIProgressView.
We start simply adding a new UIView subclass called OBProgressBar
					class OBProgressBar: UIView {

    override init(frame: CGRect) {
       super.init(frame: frame)
    }

    required init(coder aDecoder: NSCoder) {
       super.init(coder: aDecoder)!
    }
}
Suppose we want our progress bar to be a curve instead of the mainstream horizontal line. We need to specify the curve somehow, so we’ll use a specialized subclass of CALayer called CAShapeLayer. This kind of layers are capable of drawing itself using the shape you define via the path property. We can specify it defining a UIBezierPath and retrieve de CGPath from it.
In this case, for the creation of the bezier path, we’ll be using PaintCode, an awesome app that allows you create bezier paths graphically, or create the path from vector images. It is as simple as drawing shapes and curves for exporting it later in Swift code.
After we got the bezier path with a design that we want, we need to add some properties to our class for managing the curves. Let’s add the following at the top of the class:
					class OBProgressBar: UIView {
   fileprivate var bezierPath:UIBezierPath!
   fileprivate var progressLayer : CAShapeLayer!
   fileprivate var backgroundLayer : CAShapeLayer!
   . . .
We’ll use two shapes, one for the bar background, and another for the progress itself. We don’t want these properties to be modified outside the class so we keep it as private. We also need to change the constructor a little bit to let the class know what path we’ll be using. Also, we have to add a method for initializing the shape layers.
					init(frame: CGRect, path: UIBezierPath) {
   super.init(frame: frame)
   bezierPath = path
   setup()
}

func setup() {
   progressLayer = CAShapeLayer()
   progressLayer.frame = CGRect(x: 0, y: 0, width: self.frame.size.width, height: self.frame.size.height)
   progressLayer.path = bezierPath.cgPath
   progressLayer.lineWidth = 3
   progressLayer.strokeColor = UIColor.red.cgColor
   progressLayer.fillColor = nil
   progressLayer.strokeEnd = 0.0

   backgroundLayer = CAShapeLayer()
   backgroundLayer.frame = CGRect(x: 0, y: 0, width: self.frame.size.width, height: self.frame.size.height)
   backgroundLayer.path = bezierPath.cgPath
   backgroundLayer.lineWidth = 3
   backgroundLayer.strokeColor = UIColor(colorLiteralRed: 240/255, green: 240/255, blue: 240/255, alpha: 1.0).cgColor
   backgroundLayer.fillColor = nil

   self.layer.addSublayer(backgroundLayer)
   self.layer.addSublayer(progressLayer)
}
The shape layers are pretty self-describing, you can change its colors, path, line width etc. The key property for our case is the outline: we need to stroke the path to a given percentage according to the actual progress. This is possible with the property strokeEnd, a relative value telling the location to stop stroking.
Let’s add a property to our class called progress:
					var progress: Float = 0 {
	didSet(newValue) {
            progressLayer.strokeEnd = CGFloat(newValue)
        }
    }
The didSet observer allows us to do additional tasks when the variable is set. In this case, we need to update the strokeEnd property to match the new progress.
And that’s it, we can use it simply instantiating the class and setting the progress to the according value at a time.
					let frame: CGRect = …
let path: UIBezierPath = …
let progressBar = OBProgressBar(frame: frame, path: path)
progressBar.progress = 0.5
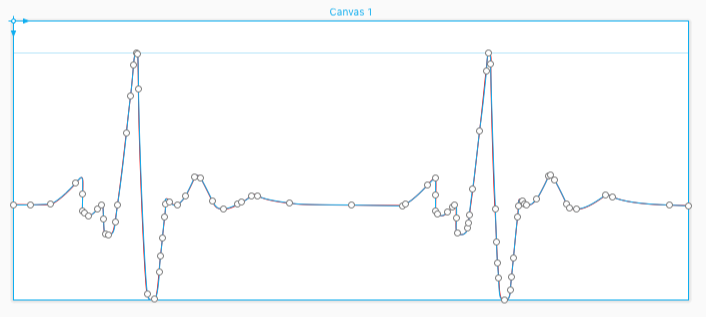
In this example, we attach the value of a slider with our custom bar for seeing it in action. You can use it as a replacement of the UIProgressView, for your downloads progress, long running task or simply to indicate the progress of a video.

Another example
In a future post, we’ll be showing how to implement another key component of mobile user experience, that use pretty much the same code. We are talking about the Activity Indicators. Meanwhile, have fun developing these awesome bars :).
See related posts

Mobile Development with SwiftUI and Jetpack Compose
Moving away from traditional mobile development with simplicity and innovation: building native apps with SwiftUI (iOS) and Jetpack Compose (Android).

Octobot Ranked as Top Web & Mobile App Developer by Clutch
Get to know why Clutch selected us as a Top Web & Mobile Development Company.